
App Inventor: Vytvorte aplikáciu pre Android - tutoriál
V tomto praktickom tipe vysvetlíme, ako vytvárať aplikácie pre Android pomocou App Inventor. Ak chcete zostaviť aplikácie v relatívne krátkom čase, postupujte podľa tohto návodu.
Prihláste sa do aplikácie MIT App Inventor
Prejdite na webovú lokalitu App Inventor a kliknite na tlačidlo Vytvoriť v pravom hornom rohu.
- Aplikácia Inventor vyžaduje povolenie na prístup k svojmu účtu Google. Potvrďte kliknutím na „Povoliť“.
- Po prvom prihlásení sa môžete zúčastniť prieskumu. Ak si to neželáte, kliknite na „Nikdy sa nezúčastniť prieskumu“.
- Potom kliknite na „Pokračovať“ do pracovného priestoru aplikácie Inventor.

Vytvorte prvú aplikáciu v aplikácii App Inventor - rozloženie
- Kliknite na tlačidlo Nový projekt v ľavom hornom rohu. Zadajte názov projektu a vyberte „Ok“.
- Teraz potiahnite „štítok“ z „používateľského rozhrania“ vľavo na obrazovku zobrazenú v strede. V časti „Vlastnosti“ môžete zmeniť „Text“ pre označený novo pridaný štítok.
- Uložte svoj projekt cez „Projekt“ a vyberte „Uložiť projekt“.
- Teraz môžete na obrazovku posúvať všetky ostatné prvky používateľského rozhrania. Ďalší mediálny obsah je možné pridať aj prostredníctvom položky „Kreslenie a animácia“.
- Pomocou rozloženia zmeňte usporiadanie svojich prvkov.
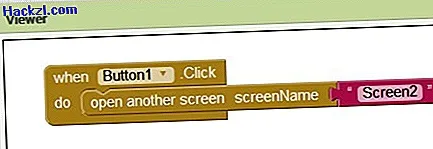
Logika blokov - príklad
Ak chcete pre svoju aplikáciu vytvoriť ďalšie obrazovky, kliknite na „Pridať obrazovku“. Potom môžete napríklad prejsť na druhú obrazovku v rozložení pomocou prvku používateľského rozhrania „Tlačidlo“. Na to však musíte mať spustenú logiku na pozadí. V aplikácii App Inventor ich zostavujete pomocou „Blokov“.
- Ak to chcete urobiť, kliknite na možnosť Bloky vedľa položky Návrhár v pravom hornom rohu. Tam prejdete na zodpovedajúcu obrazovku a kliknite na tlačidlo na ľavom displeji „Bloky“.
- Vyberte funkciu „keď Button1.Click do“.
- Teraz do tohto prvku „Puzzle“ vložte prvok „Ovládanie“, a to „otvoriť ďalšiu obrazovku screenName“.
- Teraz chýba iba prezývka. Kliknite na „Text“ na obrazovke Bloky a vyberte horný prvok, ktorý pozostáva iba z dvoch úvodzoviek.
- Do tohto textového prvku, v tomto príklade „Screen2“, zadajte názov obrazovky.
Otestujte aplikáciu na svojom smartfóne
Ak chcete otestovať svoje aplikácie vytvorené v aplikácii App Inventor priamo na smartfóne s Androidom, postupujte podľa nasledujúcich krokov.
- Nainštalujte do svojho smartfónu s Androidom aplikáciu MIT App Inventor Companion.
- Skontrolujte, či sa váš počítač a smartfón s Androidom nachádzajú v rovnakej sieti Wi-Fi.
- Otvorte aplikáciu na vašom smartfóne a kliknite na „Pripojiť“ na hornom paneli s ponukami na vašom počítači a vyberte „AI Companion“.
- Klepnite v aplikácii na vašom smartfóne na „skenovať QR kód“ a naskenujte QR kód zobrazený na vašom PC. Prípadne zadajte 6-ciferný kód zobrazený v textovom poli aplikácie a klepnite na tlačidlo „Spojiť s kódom“.
- Aplikácia si teraz môžete vyskúšať na svojom zariadení Smarpthone.
Otestujte aplikáciu pomocou emulátora
Ak nemáte smartphone k dispozícii, otestujte svoju aplikáciu na emulátore integrovanom v aplikácii App Inventor.
- Stiahnite si a nainštalujte softvér App Inventor.
- Teraz otvorte nainštalovanú aplikáciu. Na vašom počítači sa otvorí obrazovka mobilného telefónu.
- Teraz kliknite na ikonu „Pripojiť“ na paneli s ponukami aplikácie App-Inventor pod otvoreným projektom a vyberte tam „Emulátor“. Možno ste museli klepnúť na „Obnoviť pripojenie“, ak ste boli predtým pripojení k smartfónu.
- Aplikácia sa teraz zobrazí v emulátore.
- V niektorých prípadoch sa zobrazí chybová správa. Aplikácia Sprievodca preto už nie je aktuálna. V zobrazenom okne kliknite na tlačidlo „OK“.
- Aktualizáciu potvrďte v emulátore pomocou „OK“ a „Inštalovať“. Nakoniec kliknite na „Done“ na obrazovke emulátora.
- Pripojte sa znova cez „Pripojiť“ -> „Obnoviť spojenie“ a potom „Pripojiť“ -> „Emulátor“.
Po vytvorení aplikácie môžete uložiť súbor .apk s aplikáciou do počítača na paneli s ponukami pomocou možnosti Zostaviť. Po zverejnení aplikácie v službe Google Play by ste mali zvážiť aj marketing svojej aplikácie.