
Audacity: export zvukových klipov
Pomocou bezplatného zvukového nástroja Audacity môžete exportovať časti klipov. Je to napríklad potrebné, ak ste digitalizovali kazetu a všetky skladby sú v jednom súbore. Postupne vysvetľujeme, ako oddeliť klipy Audacity v tomto praktickom tipe.
Exportujte zvukové klipy pomocou Audacity
Ak chcete klip uložiť do niekoľkých súborov, postupujte takto:
- Otvorte ľubovoľný zvukový súbor. Ak to chcete urobiť, stlačte súčasne „Ctrl“ „+„ O “a vyberte súbor. Podporované sú WAV, OGG, FLAC a MP3.
- Na priblíženie trasy stlačte „Ctrl“ + „1“. Ak chcete zobrazenie oddialiť, namiesto „1“ stlačte „3“.
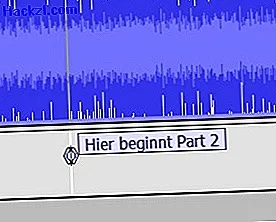
- Stlačte tlačidlo preskočiť späť. To vám pristane na úplnom začiatku trasy. Teraz ste zlomili štítok. Ak to chcete urobiť, stlačte klávesy Ctrl + B.
- Prehrajte skladbu pomocou tlačidla Prehrať do bodu, kde ju chcete zdieľať. Pomocou tlačidla pauzy zastavíte presne miesto, kde chcete skladbu rozdeliť. Znova stlačte „Ctrl“ + „B“.
- Ak sú štítky nastavené správne, môžete exportovať obe skladby jednotlivo. Kliknite na „Súbor“ a potom na „Exportovať viac súborov“.
- Teraz si môžete zvoliť formát. Napríklad vyberte MP3, ak chcete súbor preniesť do MP3 prehrávača. Sem tiež zadáte cieľový adresár.
- Správna voľba „Záložky“ je už predvolene vybraná v časti „Vytváranie súborov na základe“. Začiarknutie políčka „Zahrnúť zvukové súbory pred prvú záložku“ nie je potrebné, pretože prvý štítok ste nastavili hneď na začiatku skladby.
- Po potvrdení pomocou možnosti „Exportovať“ môžete metadáta exportovaných skladieb upravovať jednotlivo.
- Potvrďte dvakrát pomocou „Ok“. Potom sa súbor exportuje. Ak ste vybrali formáty súborov, napríklad MP3, možno budete musieť stiahnuť a nainštalovať príslušný kodek. Ako to funguje pre MP3 nájdete tu.
Vedeli ste? V Audacity si môžete vytvoriť vlastné klávesové skratky a pracovať ešte rýchlejšie. V tomto praktickom tipe sa dozviete, ako to urobiť.