
Mumble: Vytvorenie servera - ako to funguje
Ak si chcete vytvoriť vlastnú hlasovú konferenciu s programom Mumble, potrebujete vlastný server. Ukážeme vám, ako to urobiť krok za krokom.
Krok 1: nainštalujte Mumble a Murmur
- Najprv si stiahnite najnovšiu verziu Mumble a spustite inštaláciu.
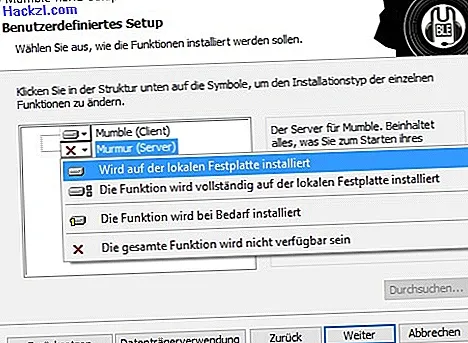
- Akceptujte licenčnú zmluvu a kliknite na „Murmur (Server)“ v ďalšom kroku.
- Vyberte možnosť „Bude nainštalovaná na lokálny pevný disk“ a kliknite na „Ďalej“.
- Softvér a serverový softvér sa inštalujú pomocou tlačidla „Inštalovať“.
Krok 2: nastavte Mumble a Murmur
Poznámka: V pokynoch vždy rozlišujte medzi dvoma nástrojmi Mumble a Murmur.
- Spustite Murmur a potom potvrďte bezpečnostný dotaz brány firewall.
- Kliknite pravým tlačidlom myši na ikonu na systémovej lište a vyberte možnosť „Zobraziť protokol“.
- V strede nájdete heslo pre „SuperUser“ a port uvedený nižšie.
- Teraz spustite program Mumble a postupujte podľa sprievodcu nastavením. Tu si môžete softvér prispôsobiť podľa svojich potrieb.
- Potom vyberte možnosť „Automaticky vygenerovať certifikát“ a sprievodcu ukončite.

Krok 3: Vytvorte si vlastný server pre Mumble
- Ak v Mumble kliknete na tlačidlo „Pridať server“, môžete si vytvoriť svoj vlastný server.
- Názov je voľne voliteľný. Na zadanie adresy použite „localhost“ v miestnej sieti, na internete použite svoju vlastnú IP adresu.
- Port, používateľské meno a heslo ste už videli v kroku 2 v Murmur a teraz ich môžete vložiť.
- Zatvorte okno pomocou „OK“, vyberte server a kliknite na „Pripojiť“ nižšie.
- Potvrďte nasledujúci dotaz pomocou „Áno“, server je vytvorený.

Teamspeak predstavuje novú funkciu „TS Sync“
Tip: V nasledujúcom praktickom tipe vám ukážeme, ako správne nastaviť server Mumble.