
Photoshop: vytvorte šípky
Vo Photoshope si môžete vytvoriť šípky sami alebo použiť vopred vyrobené tvary. Tento praktický tip vám ukáže, ako ich nájsť a vložiť.
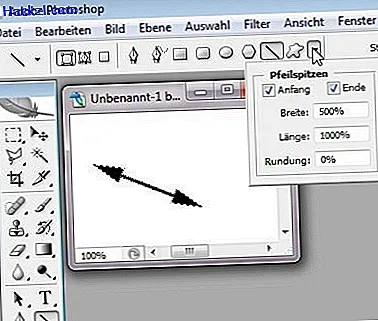
Vytvárajte šípky vo Photoshope - pomocou nástroja na kreslenie čiar
- Na palete nástrojov vyberte "Nástroj na kreslenie čiar". Nájdete ho v ponuke pod textovým nástrojom. Stláčajte tlačidlo, kým sa neotvorí rozbaľovacia ponuka. Potom vyberte vhodný nástroj.
- Možnosti nástrojov sa teraz zobrazia pod panelom úloh. Tam otvorte "Možnosti geometrie". Ak to chcete urobiť, kliknite na malý trojuholník napravo od výberu tvaru.
- Teraz skontrolujte „Štart“ a / alebo „Koniec“ - podľa toho, kam chcete pripojiť šípku.
- Percentá pre šírku, dĺžku a zaokrúhľovanie môžete použiť na reguláciu tvaru a veľkosti šípok.
- Potom v dokumente nakreslite čiaru. Teraz dostanete šípku podľa predtým nastavených parametrov. Samozrejme ich môžete stále upravovať.
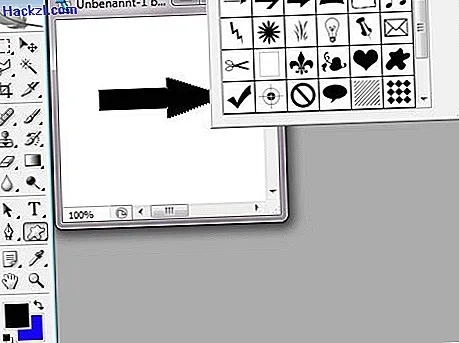
Vytvorte šípky vo Photoshope - pomocou nástroja na prispôsobenie tvaru
- Na palete nástrojov vyberte „Nástroj pre vlastný tvar“. Nájdete ho v ponuke pod textovým nástrojom. Stláčajte tlačidlo, kým sa neotvorí rozbaľovacia ponuka. Potom vyberte vhodný nástroj.
- Na lište pod panelom úloh teraz vidíte možnosti nástroja. Z ponuky „Tvar“ vyberte požadovaný tvar šípky.
- Pomocou myši nakreslite obdĺžnik požadovanej veľkosti. Šípka sa vytvorí vo vybratom tvare a veľkosti.
V nasledujúcom článku si prečítajte, ako retušovať chyby vo Photoshope.